Hey all, so I have been experimenting with different techniques in the kitchen. My latest concoction was... AMAZING. I'm pretty sure my husband hates me because I feed him so much sugar and fat and yet he has to stay fit enough to pass his upcoming APFT (Army Physical Fitness Test).
This latest recipe was based off of this recipe that I found on Pinterest.
All I did was substitute the oreos for Reeses Peanut Butter Cups and Voila!!
INGREDIENTS:
1 package of Nestle Premade cookie dough. Slightly softened.
24 Reeses Peanut Butter Cups (they were on sale at Walmart!)
1 box of brownie mix and the water/oil/eggs required by the mix
1. Preheat the oven to 350. The blogger for the oreo bars suggests lining the pan with foil or wax paper and then spraying with cooking spray. I was lazy and didn't do this and my brownies were a little tough to get out of the pan. I don't think the taste suffered any though!
2. I took my tube of cookie dough and I cut it into half inch disks. I then layered the bottom of my pan with the disks and then smushed them together to create one solid pan of cookie dough. I found that cutting them first helped me to evenly distribute the cookie dough. ALSO, if you want thicker brownies you can use an 8x8 pan rather than the 9x13 pan I used, and then you only need 12 Reeses Cups. I would still use a whole thing of cookie dough and an entire batch of brownie batter though.
3. Layer the entire pan with the Reeses Cups
4. Make the brownie Mix as directed on the package.
5. Pour the brownie batter evenly over the Reeses Peanut Butter Cups
6. Take a minute to eat the leftover brownie batter. I know I know I know you're not supposed to because of the eggs, but I freely admit that in this case I am a rule breaker and it is just delicious!
7. Bake at 350 for 40 minutes. Let cool and enjoy!
I'm not as good at taking food pictures as other bloggers might be, but use your imagination, because these were just fantastic!
Great! Everyone have an amazing day and check out my other blog posts. There are some other recipes and also a ton of handmade jewelry!
Hey everyone! I hope you are all having a glorious/sweltering day. I know I am!
So, many people have been asking me about the jewelry I've been making. I started making jewelry to give myself something to do down here in UCLA (Ugly Corner, Lower Alabama) but I've discovered I really love being able to create something usable and beautiful or fun. I love allowing myself to be super creative, or at least to use the ridiculous amount of beads I've purchased over the last couple of months. Below are a bunch of pictures of pieces I've created. The red heart necklace is spoken for (by me!) but the rest of it will eventually (hopefully) be sold on an etsy account I have yet to make. I was thinking that I might name my store JK Boutique, with the tagline being "It's Jewelry. It's Kismet." Do people know what Kismet means? Please leave your suggestions for boutique names in the comments section below. I would be happy to get the help and if I choose your name, FREE EARRINGS. Seriously.
Awesome. So here are some of the pictures of stuff I've made. I was thinking that earrings would run between $8-12 and necklaces around $15-20 ish. Awesome.
OH! Also, PLEASE forgive the crappy photography. I haven't really figured out how to take pictures of this kind of thing, although I did find a great use for my china dinner plate :) Note: The flash sometimes made strange reflections, and the colors are much more vibrant in person.
Red Heart Necklace Repurposed from an Italian Glass pendant given to me by my inlaws :)
again
Bird's Nest Necklace
Again
Close Up Bird's Nest Necklace
Sorry, I had a really tough time capturing this one
Asymmetrical necklace.
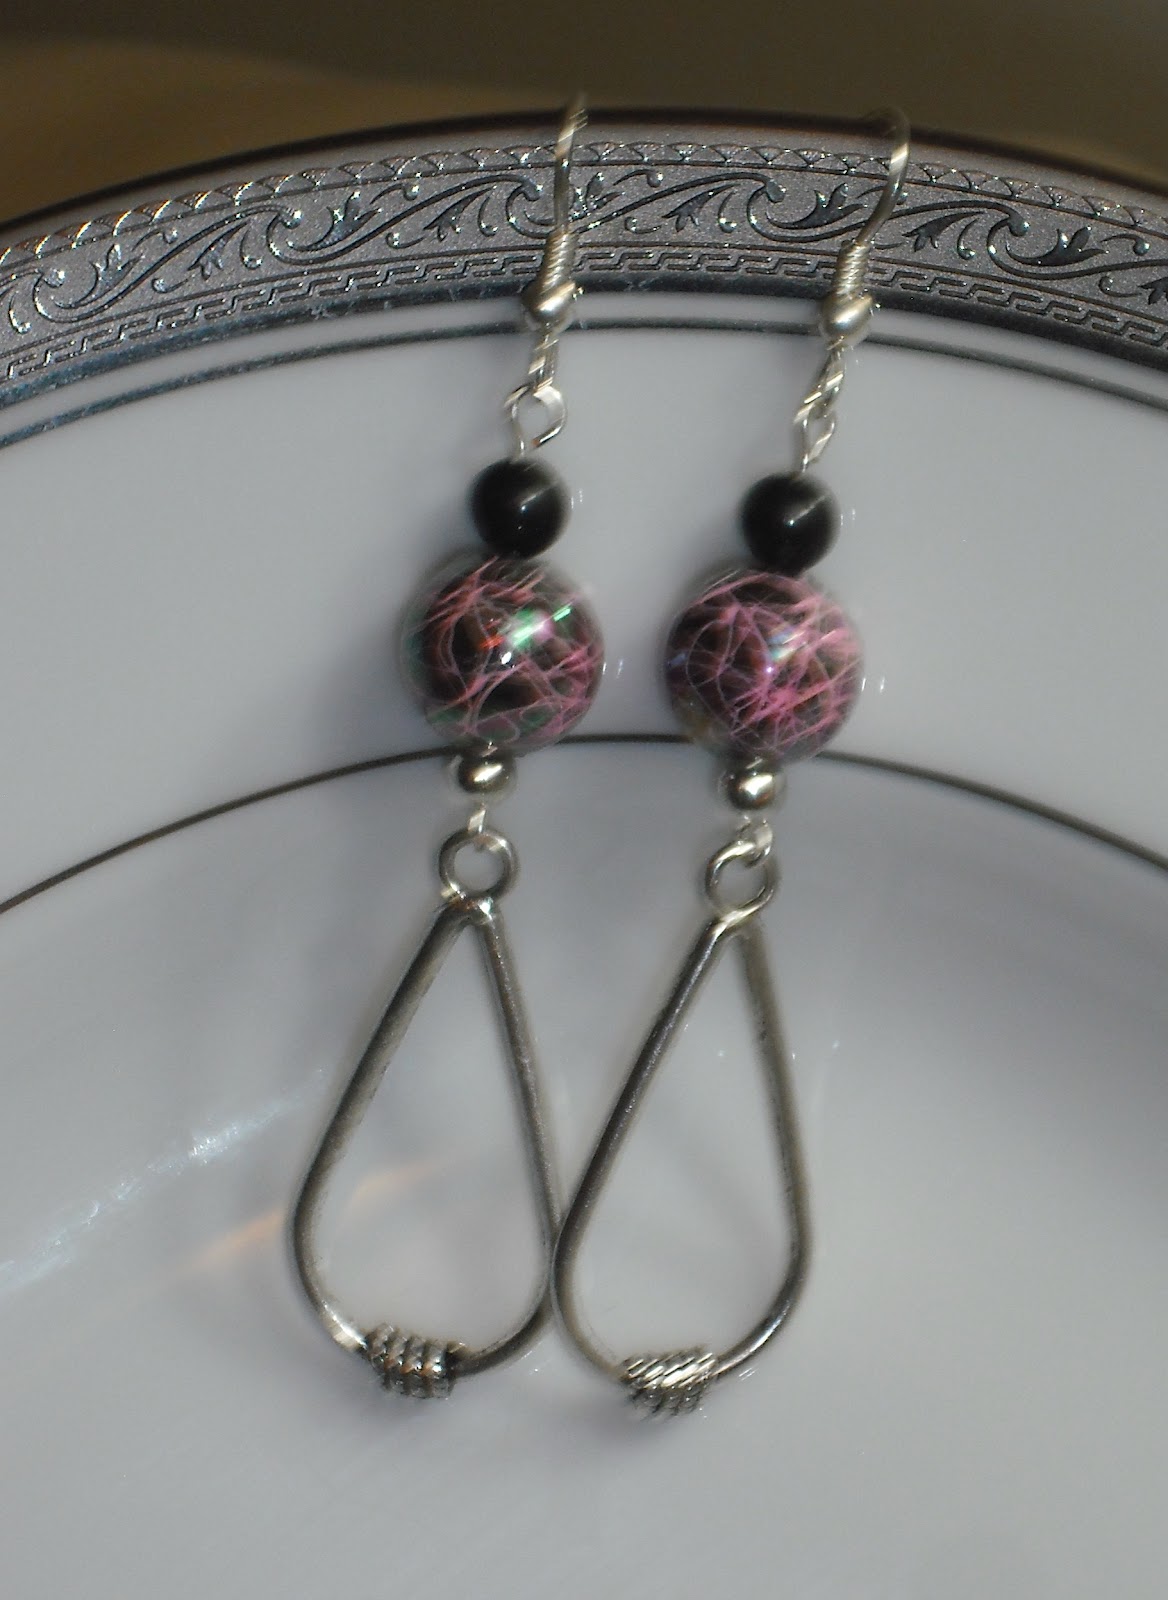
Psychedelic Sweetheart Necklace
Psychedelic Cherries Earrings
Again
Cute together!
Garden Party Earrings
Inspiration Earrings in Crystal
Happy Tears Earrings
InspiRED earrings
A Whole New World Earrings
Purple Vineyard Earrings
Cosmic Earrings in Pink
Cosmic Earrings in Pink
Aztec Lime Necklace and Earrings
Close Up
Jazzercise Earrings in Pink and Lime
Purple Heart and Silver Sweetheart Earrings (PS. The purple ones are Much More purple than in the picture)
More Inspiration Earrings. They say, "Believe in Love," "Never Never Give Up," "Live Laugh Love," "Live Your Dream," "Karma," "Love and Be Loved."
I've also made some other awesome necklaces and even a charm bracelet, but they were gifts and I gave them away before I got pictures. I have an awesome one with wooden beads, and some beautiful blue beads with silver filigree work that I gave my mom for mother's day.
So leave a comment and let me know what you think!
Hey everyone! So a lot of people have been asking me what it
is that I do exactly in Alabama. To be honest, that question is something I’ve
been asking myself for months, and my lack of an answer has been really
frustrating for me. It’s one of the reasons I stopped blogging for a while. I
got discouraged and felt like the things I was doing down here weren’t that
important.
I have since learned that I was wrong. I had a conversation
with my husband about the Jewish mitzvah (commandment) of tzedakah (giving
charity). In the Jewish faith, it is a mitzvah to give 10% of your earnings to
charity, and while we have a tzedakah jug that is a huge glass jug that used to
have peach cider in it that we picked up in South Carolina on our drive down
here last summer, it isn’t so full. The conversation started because I wanted
to give more tzedakah and my husband said something truly simple that I just
hadn’t thought of before that moment. He said, “Oh. I was just considering your
volunteer work as tzedakah for the time being.” I had been looking at my
volunteer work as a way to keep busy and I was looking at it as purely selfish.
I know it sounds silly, but the thought that I was actually giving back hadn’t
crossed mind. Usually this works the other way. People want to give back and
don’t ever think about how the skills they learn and utilize in volunteer work
helps them with careers later on in life or even just in their personal
relationships.
I may be a little backward in how I got into this whole
volunteering business, but I have since learned how special volunteering really
is. Jews believe that to save a life is to save a whole world, and the same
applies to volunteering. To help another person is really helping the whole
world.
So as of this moment, I am now volunteering in five
different positions. Below is a little description of each.
I am the FRG leader of my husband’s flight class. FRG stands
for Family Readiness Group. It is for the spouses and families of the soldiers
and is also for the soldiers themselves. I am a source of information, support,
connection, and fun. My job is to connect the members of my husband’s flight
class and give them the information that is necessary to their lives. What time
is the gate closing today? How do I get childcare? When will their training be
over? What is Family Day? I also plan activities like barbecues and possibly a
dance/get together at the end of training.
I volunteer at the Wiregrass Museum of Art in Dothan,
Alabama. The past two weeks, I’ve been helping out with their art camp. The first week
we had younger kids, 7-9 and this past week we had older kids 9-13. They did
different art projects and were introduced to the fundamentals of art like
color and pattern, symmetry and perspective, paint, collage, batik, murals, and
pottery. I have also volunteered with them when they went into third grade
classrooms throughout the area and taught the students about Cubism and
Picasso, and made tangrams with them.I have decided to apply to Masters programs
in Museum Education. I really want to work with artifacts and the archaeology
side of museums, but seeing the faces of these kids light up when they see,
make, or experience art is worthwhile in and of itself.
I am helping one of the offices on post with their filing.
Case in point. They hadn’t alphabetized their filing cabinet in three years. I
can help!!!
I am teaching a vegetarian cooking class on Tuesdays in
August. I may also start volunteering in the afternoons now that Art Camp is
over. All of this is for the Edge Program on post which gives pre-teens and
teens something to do in the afternoons after school is out or during the
summer. Each day is different, but each week follows the same pattern for a
month and then it switches up. Fort Rucker just built a new Teen Center, so
once it officially opens I will probably help out with activities there as
well. I love how volunteering works. I walked into the office, sat down with
the mastermind of the Edge program, talked about things I like to do, and ended
up promising to teach teens how to cook. The menu is something along the lines
of Ratatouille and Homemade Pasta, Eggplant Parmesan, Stuffed Peppers and Taco
Salad, and probably banana bread and pumpkin cookies thrown in their somewhere.
I have become a chef in my own home, so we will see how that translates to
teens used to a diet of steak and potatoes, and who have probably never eaten
an eggplant. It should be fun.
Finally, I have been taking AFTB classes, and I have become
an instructor after an intensive week of instructor training. AFTB is Army
Family Team Building. There are three levels of classes that you don’t have to
take in order. Level One is basic Army knowledge: military acronyms, the rank
system, customs, how to read your earning statement, your benefits and
entitlements, etc. This class is an Amazing introduction to army life and a
great way to make friends who are going through the same things that you are
going through. Level Two is about Personal Development, including conflict
management, communication skills, personality, strengths, and crisis and coping
etc. Level Three is all about Leadership and how to strengthen your team and
yourself using your skills. It is about communication and encouragement, and
team dynamics and problem solving from a leadership standpoint. AFTB really
helps army spouses thrive in the army community by giving them knowledge, and
resources, and helping them become resilient and self confident. It helps them
learn to rely on themselves, help others, and learn to ask for help as well as
where to look for that help. After going through the AFTB training myself, I
really see how tight a community the army really is if you take advantage of
all that it has to offer. I may also now be in charge of the Fort Rucker AFTB
newsletter, but we will see how that pans out in the next month.
Here is a video about AFTB that is really quite fantastic. :)
Anyway, volunteering down here has really become my life. I
volunteer and then I come home, do some housework and inspire myself on
pinterest. Then I make lists of brownie recipes and other chocolatey goodness
that I find and add it to my lists of crafts I want to do. WARNING: everyone
might get homemade gifts this year. Pinterest = <3 but that may be another
post on another day.
Hey everyone! Long time no blog. I got a little down down
here, but I am back and I promise to make more of an effort to entertain you
all with a little glimpse into my Northern life down here in the South.
So Independence Day is HUGE in the Army. The soldiers all
got a mini weekend in the middle of this week so I decided to make my husband
something really special to show him how much I support him and his role in
defending our country. I got the idea to use fruit from some Flag looking toast
that I saw on Pinterest (tomorrow’s breakfast), but it’s me, so it had to be
something sweet. What was born was Independence Pudding! Check it out!
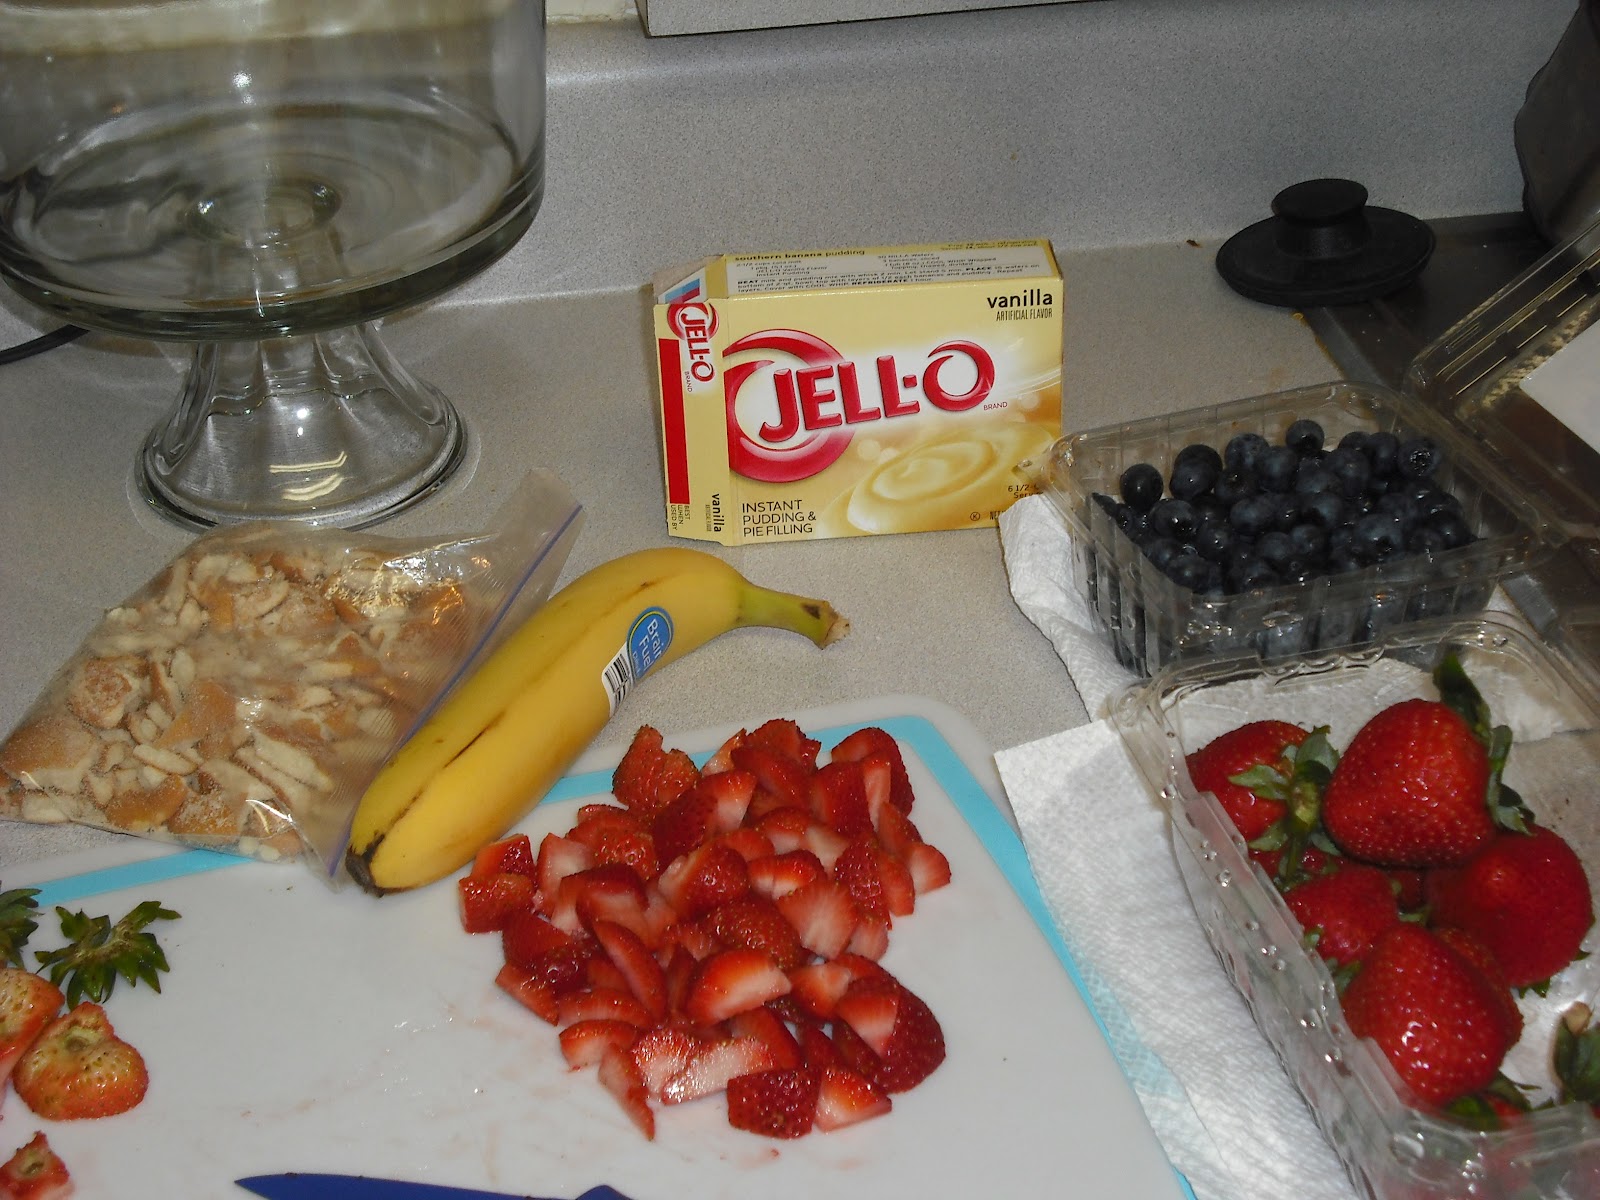
Ingredients:
1 Large Box of Jello Instant Pudding (Vanilla Flavor) 61/2 –
8 Servings
3 Cups of Milk
1 8oz tub of Cool Whip Light
Red and Blue Food Coloring. I used Betty Crocker Classic Gel
Food Colors
A couple handfuls of Ruduced Fat Nilla Wafers
1 Banana
Half a Package of Strawberries
Half a Package of Blueberries
I started out making the Vanilla Pudding according to the
directions on the box. After 2 minutes of whipping, I then added the tub of
Cool Whip, whipping it into the pudding mixture before it had time to truly
set. The cool whip lightened the color of the Vanilla Pudding and added volume
and lightness. French Vanilla Pudding has a lighter color to begin with and I
would use that in the future.
* Note *
I thought about using cheesecake flavored pudding, but I thought the flavor
would be too strong next to the fruit. The choice is yours. Banana might also
taste great with this.
I then separated the mixture into three separate bowls,
leaving twice as much pudding in Bowl 1. Bowl 1 I left as it was and put it in
the fridge. To Bowl 2 I added a squirt of blue food coloring and stirred it
into the pudding. It came out slightly more green than truly blue, but it still
looked pretty cool. To Bowl 3 I added a squirt of red food coloring. I put
these in the fridge to set.
I then washed the strawberries and blueberries and cut up
the strawberries and bananas into bite sized pieces. I also crushed a handful
of the nilla wafers into large crumbles.
After I had cut the fruit, the pudding was set and ready to
go. In order, I layered White vanilla pudding mixture, Strawberries, Blue
vanilla pudding mixture, a combination of Bananas and Nilla Wafers, Red vanilla
pudding mixture, Blueberries, the rest of the White vanilla pudding mixture and
topped it off with super small crumbles of the Nilla Wafers.
This is the banana/Nilla Wafer layer. My husband LOVED the crunch right after I made it, but I love when it gets a little soggy and tastes like cake.
Looking back, I would add more fruit to the fruit layers to
make them more visible, but all in all it looks pretty cool and patriotic and
tastes DELICIOUS! My husband loved it and I can tell that this is going to
become a regular part of our 4th of July celebrations, Promotions,
Hail and Farewell’s and other army related celebrations.